Archive
How to install Arch Linux on a VM VirtualBox (II)
In the last entry we began to see howto install Arch Linux on a VM VirtualBox. We created and setup the virtual machine and installed the Arch Linux. Now we are going to see how to setup Arch Linux for running smoothly on the virtual machine.
So we logon as root and continue our work. The first thing to do is to be sure that you can use the keyboard. If your keyboard layout is English you have to do nothing but if it is not then you need to setup the proper keyboard layout. In my case (Spanish layout) I have to run the command:
# localectl set-keymap --no-convert es
which set the value of the KEYMAP variable in the /etc/vconsole.conf file:
KEYMAP=es
This configuration is persistent and also applies to the current session. You can find more information about how to configurate the keyboard in console here.
Next thing is to automatically connect to the Internet when the system boots. We can achieve this goal if we start the DHCP as a service:
# systemctl enable dhcpcd.service

Created symlink from /etc/systemd/system/multi-user.target.wants/dhcpcd.service to /usr/lib/systemd/system/dhcpcd.service

# reboot
We logon again and check the network connection using the ping command:
# ping -c 3 www..google.com

PING www.l.google.com (74.125.224.146)   56(84) bytes of data.

64 bytes from 74.125.224.146: icmp_req=1 ttl=50 time=437 ms

64 bytes from 74.125.224.146: icmp_req=2 ttl=50 time=385 ms

64 bytes from 74.125.224.146: icmp_req=3 ttl=50 time=298 ms
--- www.l.google.com ping statistics ---
3 packets transmitted, 3 received, 0% packet loss, time 1999ms
rtt min/avg/max/mdev = 298.107/373.642/437.202/57.415 ms
Now let’s pay attention to the time synchronization. It is an important topic on a virtual machine because the CPU is shared among several systems. For instance you can see time delays on your virtual machine if the host system goes to sleep. There are several options for getting the time synchronized. The following works fine for me:
# pacman -S ntp

# systemctl enable ntpd.service

Created symlink from /etc/systemd/system/multi-user.target.wants/ntpd.service to /usr/lib/systemd/system/ntpd.service
i.e. I install the ntp package (which contains an NTP server and client) and start it as a service every time the system boots but I don’t setup my system as an NTP server. This setup causes the hardware clock to be re-synchronised every 11 minutes. In theory there are simpler ways to achieve the synchronization goal (like using SNTP) but I’ve not been able to do they work properly. You can get more information about this topic here and here.
After checking that time synchronization works fine we can go to the next task: adding a new user. It is a typical task when administering a Lynux system and can be done easily:
# useradd -m -s /bin/bash vicent

# passwd vicent

Introduzca la nueva contraseña de Unix:

Vuelva a escribir la nueva contraseña de Unix:

passwd: contraseña actualizada correctamente
The above commands create a user called vicent, create its home directory in /home/vicent, give it a bash shell and set his password.
Next we’ll add the new user to the sudoers file. This way vicent will be able to execute a command with root privileges temporarily granted to that single command. How privileges are scaled depends on how the sudoers file is changed. In order to get both the sudo command and the sudoers file we install the sudo package:
# pacman -S sudo
Instead of editing the sudoers file directly we create files under the /etc/sudoers.d directory. These files will be automatically included in the sudoers file every time the sudo command is issued. This way we keep the sudoers file clean and easy to read. The sudoers file and the files under /etc/sudoers.d are edited with the visudo command which edit the files in a safe fashion (see the man page of the visudo command for details):
# visudo -f /etc/sudoers.d/90-vicent
We add the following line to the file:
vicent ALL=(ALL) ALL
It means that, on all hosts where this sudoers file has been distributed, vicent can execute any command with root privileges (after being prompted with vicent‘s password).
Now it’s time to install the graphical components. We begin installin the X Window System as follows:
# pacman -S xorg-server xorg-server-utils xorg-apps xorg-twm xorg-xinit xterm xorg-xclock ttf-dejavu --noconfirm
The above command will install the main components of the X, including the twm window manager. The X configuration files are:
- /usr/share/X11/xorg.conf.d
- /etc/X11/xorg.conf.d
None of those files contains the keyboard configuration so in order to keep my non-English layout when the X is running I execute the command:
# localectl --no-convert set-x11-keymap es
which creates the file /etc/X11/xorg.conf.d/00-keyboard.conf.
Now, before starting the X, we install the VirtualBox Guest Additions package and configure it:
# pacman -S virtualbox-guest-utils --noconfirm
we load the following modules:
# modprobe -a vboxguest vboxsf vboxvideo
and create the virtualbox.conf configuration file with the following content:
# echo vboxguest >> /etc/modules-load.d/virtualbox.conf

# echo vboxsf >> /etc/modules-load.d/virtualbox.conf

# echo vboxvideo >> /etc/modules-load.d/virtualbox.conf
Now we ensure that the user created before will be able to access with read-write permissions to the shared folder (we created the shared folder in the first part of this tutorial):
# usermod -a -G vboxsf vicent

# chown root.vboxsf /media

# chmod 770 /media
Finally we enable the guest additions service so they will be started et every system boot:
# systemctl enable vboxservice.service
Created symlink from /etc/systemd/system/multi-user.target.wants/vboxservice.service to /usr/lib/systemd/system/vboxservice.service
Now we’are ready to come back to the X Window System. Before to start it we have to create the /root/.xinitrc file (indeed we need that file in the $HOME of every user starting the X) with the following contents:
# Make sure the root user uses the right keyboard map

setxkbmap -model pc104 -layout es

# Start the VirtualBox Guest Additions

/usr/bin/VBoxClient-all

# Start the window manager

exec twm
Then we issue the startx command wich in turns sources the .xinitrc file so the result is a screen like this:

Reboot the system and logon again in a virtual console. We have reached the last step of the process i.e. the installation of a desktop environment. As I adhere to the ‘keep it simple’ philosophy of Arch Linux my choice was the LXDE. In order to install it we have to issue the following commands:
# pacman -S lxde

# systemctl enable lxdm.service

Created symlink from /etc/systemd/system/display-manager.service to /usr/lib/systemd/system/lxdm.service

# vi /etc/lxdm/lxdm.conf

uncomment the line

session=/usr/bin/startlxde
It is important to note that the startx command is not called and so the .xinitrc file is not sourced: the display manager (which is started as a service every time the system boots) calls directly to the startlxde command which is in charge of starting the LXDE desktop environment.
To make sure that the non-English keyboard map will persist between LXDE sessions we edit the file /etc/xdg/lxsession/LXDE/autostart and append the line:
setxkbmap -model pc104 -layout es
Now reboot, logon and you will get a nice LXDE screen. In my case, after some tweaking it looks like this:

How to install Arch Linux on a VM VirtualBox (I)
On this entry I’ll describe the steps I followed to successfully install Arch Linux on a VirtualBox virtual machine. The host system is a Windows 8.1.
My main source of documentation has been the excellent Arch Linux Installation Guide wiki. As the rest of the wiki it has a very high quality.
The first thing to do is to download the latest Arch ISO. While the ISO is downloading you can create the virtual machine. The properties of the VM I created are:
- name: ArchLinuxVM
- type of operating system: ArchLinux (64bit)
- RAM memory size: 2GB
- hard drive type: VDI, dynamically allocated
- hard drive size: 20GB
- bidirectional clipboard: yes
- shared folder: yes (remember that the shared folder must exist on the host system before setting this property)
- shared folder auto-mount: yes
If you aren’t new to VirtualBox and know how to setup the machine described above you can skip the next section.
Creating and Configuring the Virtual Machine
Open the VirtualBox program, click the New button of the toolbar, write down the machine name, and choose the OS type and version.

Choose the RAM size. In my case the host system has 8GB so 2GB of RAM was a sensible choice for my VM.

The next step is to create a virtual hard drive.

In the next screens we choose the disk type to be VDI and to allocate the space dynamically. Then we choose the hard disk size. The default size is 8 GB which is probably too small so we increase the size until 20GB.

We click the Create button and then we start the setup of the VM by clicking the Settings button of the toolbar.

Now we go to the General -> Advanced tab and setup the bidirectional clipboard.

Afterward we setup a shared folder. It will be useful to share data between the host and guest systems. In the host system it is seen as a regular folder. In the guest system it is a folder with the same name but living in the /media directory. Before setting up the shared folder it must be created on the host system.
We go to the Shared Folders tab, enter the path of the shared folder and tip the auto-mount check box.

If everything went O.K. it should look like this:

Eventually we select the Storage tab. Click the Add CD button (the small CD with a plus sign picture) and virtually insert the previously downloaded ISO in the CD drive of the VM.

The VM is now created and configured so we can proceed with the Arch Linux installation.
Installing Arch Linux
Now we are ready, on the VirtualBox program click Start on the toolbar and a boot screen will appear, showing you several boot options. Press Enter (i.e. choose the Boot Arch Linux x86_64). After a few seconds you will get terminal with the root user automatically logged on.

The first thing to do if you’re not using an English keyboard is to set the keyboard layout. I’m living in Spain and using a keyboard with Spanish layout so I have to run the command:
# loadkeys /usr/share/kbd/keymaps/i386/qwerty/es
Next you have to partition the virtual hard disk. But first you need to know how your disk is named, so you issue the command lsblk.
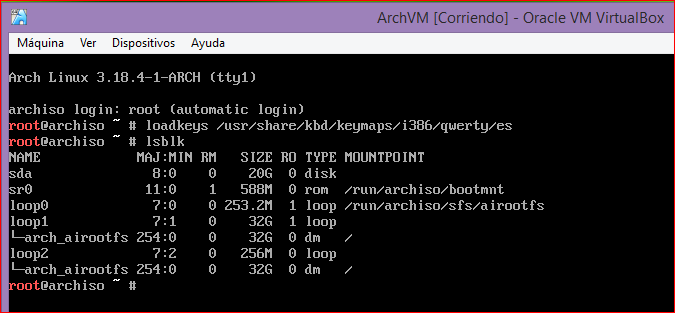
In my case the name is sda (I know it because its type is disk and it is 20 GB big). The last thing to do before partitioning is to choose the format of the partition table. You have two options: the classic MBR format and the modern GPT format. In general, if your boot loader is not GRUB legacy and you are not running a multi-boot system with Windows using BIOS, then it is recommended to use the GPT format so we will use it (you can read more about both formats here).
Now that we know the disk name and the partition table format we can issue the proper command to partition the disk, in our case:
# gdisk /dev/sda
gdisk is the GPT version of fdisk. A prompt asks we what we want to do (create new partitions, set partition start and end sectors, etc.). The following screenshot shows an example:

After partitioning the disk the partitions table looks like:

The partition 1 is for installing the GRUB bootloader, the partition 2 is for the / filesystem, the partition 3 is for /boot filesystem and the partition 4 is for the /home filesystem. As you can see we aren’t creating a swap partition. This is because we have a large amount of RAM ans a swap partition will probably not be necessary.
Next we format our partitions with the proper flavors of the mkfs command.

Now we have to create the mount points for the partitions and mount them (beware that we don’t mount the boot partition):
# mkdir /mnt/boot

# mkdir /mnt/home

# mount /dev/sda2 /mnt

# mount /dev/sda3 /mnt/boot

# mount /dev/sda4 /mnt/home
Next step is to test our connection to the Internet using the ping command:
# ping -c 3 www..google.com

PING www.l.google.com (74.125.224.146)   56(84) bytes of data.

64 bytes from 74.125.224.146: icmp_req=1 ttl=50 time=437 ms

64 bytes from 74.125.224.146: icmp_req=2 ttl=50 time=385 ms

64 bytes from 74.125.224.146: icmp_req=3 ttl=50 time=298 ms
--- www.l.google.com ping statistics ---
3 packets transmitted, 3 received, 0% packet loss, time 1999ms
rtt min/avg/max/mdev = 298.107/373.642/437.202/57.415 ms
Everything seems O.K. (no packet loss) so we go to the next step, the selection of download mirrors. We edit the /etc/pacman.d/mirrorlist file and select the desired mirrors. Regional mirrors usually work best, but it may be necessary to consider other concerns. In my case I simply selected the first five mirrors in the list (for selecting just uncomment the line containing the server). The less the score is the better the server works.

Now we download from the Internet the base system and install it:
# pacstrap /mnt base
This is the base system so don’t expect a graphical web browser to be installed 🙂
Now we generate the fstab file:
# genfstab -pU /mnt >> /mnt/etc/fstab
At this point we are ready to change root into the system:
# arch-chroot /mnt
The next steps are pretty easy. First we set the hostname and the time zone (in my case Europe, Madrid):
# echo ArchLinuxVM > /etc/hostname

# ln -sf /usr/share/zoneinfo/Europe/Madrid /etc/localtime
Then we have to generate and setup the wanted locales. It is a three steps process:
First we edit the /etc/locale.gen file and uncomment the needed locales (es_ES.UTF-8 in my case)
Second, we generate the required locales:
# locale-gen
And third, we set the locale preferences in the /etc/locale.conf file:
# echo LANG=es_ES.UTF-8 > /etc/locale.conf
Now we set the password for the root user:
# passwd
Enter new UNIX password:
Retype new UNIX password:
passwd: password updated successfully
Now it’s time to install the GRUB bootlader in the boot partition (/dev/sda1 in our case):
# pacman -S grub

# grub-install --target=i386-pc --recheck --debug /dev/sda

# grub-mkconfig -o /boot/grub/grub.cfg

Note that grub-install installs the bootloader to the desired device and copy GRUB images and modules in /boot/grub/i386-pc. In addition grub-mkconfig generate the GRUB configuration file grub.cfg and saves it under /boot/grub.
Once the bootloader has been installed we can reboot the virtual machine:
- – leave the change root environment
# exit - – optionally unmount all the partitions
# umount -R /mnt - – remove the installation media (i.e. go to the VM VirtualBox top menu and, in the Devices menu, choose CD/DVD devices and remove disk from the virtual drive)
- – issue the reboot command
# reboot
And that’s enough for today. In the next blog entry we’ll complete the virtual machine configuration (with a permanent setup of the Internet connection, user’s creation, installation of X Window System, etc.).
